
Tutorial How to build the Ultimate Bootable Custom USB Flash Drive with Multiple ISOs for Windows, Linux, Etc, and PortableApps for Windows Desktop.
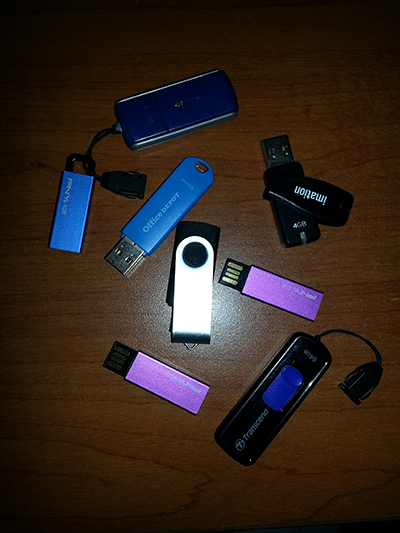
If you’re like me at all you probably have more flash drives than you want to carry around, especially when they could all probably fit on one. After my old 64GB flash drive took a dump I decided to purchase a new 64GB flash drive with USB 3.0 and compatibility for USB 2.0 and USB 1.1. When I got the new flash drive I was determined to figure out a way to get rid of my bulky CD case and just carry this one drive around with me. That means getting rid of all my Windows 7, Windows XP, Windows 8, Server 2003, Server 2008, Ubuntu 12.04, Linux Mint 13…I think you get the point. The problem is there’s no real easy way to create a flash drive that can store all of these, and boot into any of your choosing, and still be functional under Windows when using it for troubleshooting or repairing workstations…until now.
Update (10/23/2013): Some users have reported that using USB 3.0 has caused issues when setting this up…for that reason I recommend using a flash drive that is USB 2.0 if you run into any issues. I haven’t had a chance to look further into this, but once I have some free time (if ever) I will do some testing.
I spent a good couple days testing different software that could create “multiboot” flash/usb drives and ran into issues with almost all of them, but I was able to figure out a way to get what I needed without too much hassle. I also took it a little bit further and customized my own boot screen and menu items. I tested the following software:
All of those applications run on Windows besides MultiSystem which proved to only run correctly under Ubuntu (and not just any Debian flavor).
So, to start off and create the ultimate bootable USB drive you will need to download the Yumi Multiboot, Fat32 Formatter, and the MultiBoot USB (used to launch Qemu and test). I found the Yumi Multiboot software was the best for installing the menus, ISO files, and for “general mangement” of the USB drive. We will use the MultiBoot USB application to launch a Qemu instance and test the flash drive without having to reboot or use another computer. The Fat32 Formatter is used to format the USB drive using a FAT32 parition instead of “exFat” or “NTFS”. Unfortunately the only drawback to using Fat32 is the maximum file size of 4GB. I only ran into a problem with this when I tried to use an ISO I made from a Dell Windows 7 with SP1 CD. All my other CDs and ISO’s were 4GB or less so I just had to use a Dell Windows 7 ISO that didn’t have SP1 to stay under the 4GB limit. If you try using exFat or NTFS you will run into problem, so don’t say i didn’t warn you.
Format USB/Flash Drive With Fat32
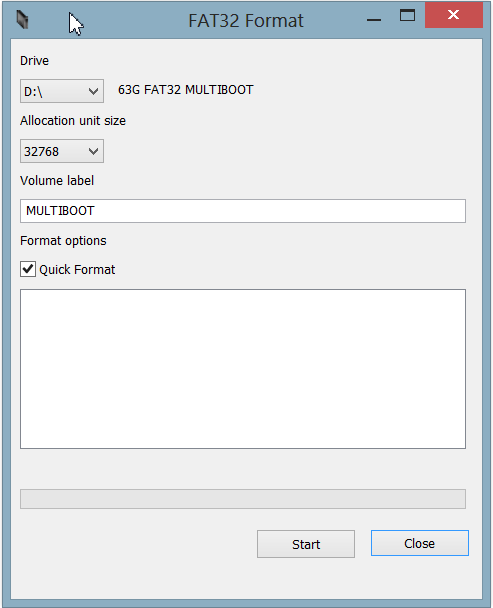
Fat32 Format GUI
So to start of you will first need to run the Fat32 Formatter to format the USB flash drive with a Fat32 Partition. Fat32 is the most compatible with all OS and ISOs but again there is a 4GB file limit size. You can decide on whatever Allocation Unit Size you want but 32768 or 65536 should be fine for a 64GB drive. The smaller the allocation size the slower the read/write speed as it will have to seek for each allocation unit size. Because a 64GB drive really only shows about 58-63GB of space I decided to use 32768. If you get any errors such as “Failed to open device – close any files before formatting” you will need to make sure you run the application as Administrator, and close anything that may be accessing the drive. Under Windows 8 I actually had to open Task Manager and kill explorer in order to run the format. After that just go to File -> Run New Task, and just enter “explorer.exe” and explorer will reload.
Start Creating or Downloading ISOs to Use
ImgBurn Create ISO
The next step to start on would be getting all your ISOs and CDs ready to transfer to the flash drive. As I mentioned earlier one of my main intentions of creating this drive was so I could get rid of my bulky CD case I seemed to be carrying everywhere. Using a software such as ImgBurn (free) you can create ISO files directly from CDs. HowToGeek has a good tutorial on how to this here. I saved all of these to a folder on my desktop named ISOs for easy organization.
Next you will want to start downloading any other ISOs you will need. You can either download them directly from the website or Yumi has a great feature which will automatically start the download for you for some of the Distributions they have listed. Go ahead and launch Yumi and select your flash drive, you will see a list of Distributions and a checkbox on the right that says “Download the iso (optional)” , select any distribution you want to include and click that checkbox. Yumi will automatically launch the download and you can repeat this process to download all the ISOs you will want to include.
Start Installing ISOs and Installers/Distributions
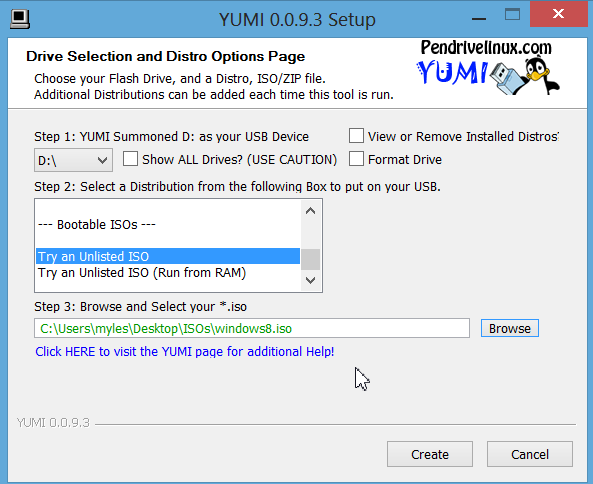
Yumi Select an Unlisted ISO
Now comes the fun part, to start putting everything together. Load up Yumi and select your flash drive. To get the drive started the first thing I installed is the ISO I created from a Dell Windows XP CD. Scroll down to “Windows XP Installer” listed in step 2 under distributions. Next click on Browse under step 3 and select the ISO you created for your Windows XP ISO. After that click next and Yumi will begin to install the Windows XP Installer along with Grub4Dos. Yumi will use a combination of Grub4Dos and Syslinux for this custom boot. After Yumi has installed the Windows XP Installer you can move on to adding additional Windows Installers. Next we’re going to add Windows 7 installer, select Yes to add more after the Windows XP is complete or just reload the Yumi application. Scroll down and select “Try an Unlisted ISO”, DO NOT SELECT Windows Vista/7/8 Installer, again DO NOT SELECT Windows Vista/7/8 Installer.
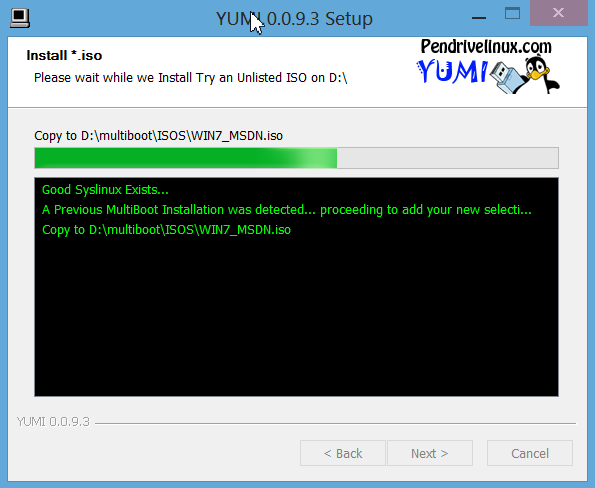
Yumi Multiboot Install Windows
If you choose that option instead of Try an Unlisted ISO, Yumi will install the Windows Vista/7/8 file to the root of the flash drive, and you DO NOT want that. It will work just fine if you install it as an unlisted ISO. So select Try an Unlisted ISO and then browse to your Windows ISO, then proceed with installation and you should see something similar to the image on the left. As you can see Yum is installing Windows 7 to D:\multiboot\ISOS\WIN7_MSDN.iso, which is what we want instead of having Yumi install it to the root of the flash drive. Continue to repeat this process for all the ISO files you want to install such as Windows and any other ISOs that are NOT listed in the Yumi list (Windows EXCLUDED). ALWAYS INSTALL WINDOWS ISO BY SELECTING TRY AN UNLISTED ISO.
Test the Flash/USB Drive using Qemu

Multiboot USB Qemu
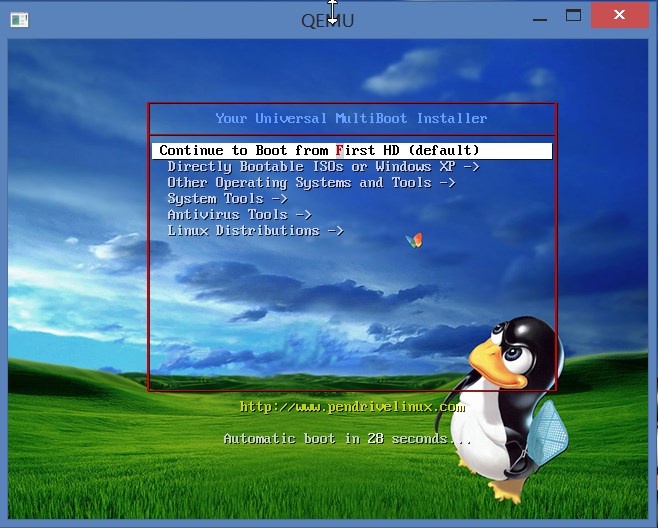
Now that you have all your ISOs installed that you want to use it’s time to fire up Qemu and test the drive out. Once we have tested and made sure the drive is functional we will then proceed to customizing the boot menu descriptions, wording, and even background. Load up the file I had to download from the beginning, Multiboot USB. Select the “Qemu” tab, select the amount of RAM you want to use and then click “Boot USB”. The screenshot has the text not looking correctly and that’s because under Windows 8 I set it to increase the size of everything so some applications that are not dynamic have issues like this, but that doesn’t have anything to do with functionality, it still works fine. After you click Boot USB another window should open which will be a Qemu session that will attempt to boot the flash drive. You should then see a screen with the Yumi background and a heading saying “Your Universal MultiBoot Installer”. If you hit enter on “Directly Bootable ISOs or Windows XP” it should bring you to the Grub4Dos screen where you should see 3 options for Windows XP and then an option for each of the Windows ISOs and any other ISOs we added using “Try Unlisted ISO” … don’t worry about the wording we will customize that next. Play around with it and make sure everything works, if you have problems try booting the flash drive on another computer to make sure it isn’t Qemu that is causing the problem. Remember how to run Qemu like this as you will be using it frequently when changing around the wording and backgrounds.
Customizing Background
New Yumi Background
After testing our USB drive we are now ready to customize it to our preferences. As you can see in the image on the left I found a background online by just searching under Google Images for “Windows Linux”. If you find a background you want to use you will need to use Photoshop or some other software to resize the image. The background MUST be 640×480, again the image MUST be 640×480. To change the main background image you just need to replace the D:\multiboot\yumi.png file with your own background. That is assuming the D drive is your flash drive. As you can see to the left I customized my background to have a Tux fly swatting a “Windows Bug” … possibilities are endless and i’m still trying to figure out a way to have this randomize a group of images.
Customizing Menus

Yumi syslinux.cfg
If you want to customize the menu that is pretty easy to do as well. There are two menus, one for the main syslinux menu and one for the grub4dos menu.
The main menu (the first one you see) will be located at
D:\multiboot\syslinux.cfg
and will look like the image on the right.
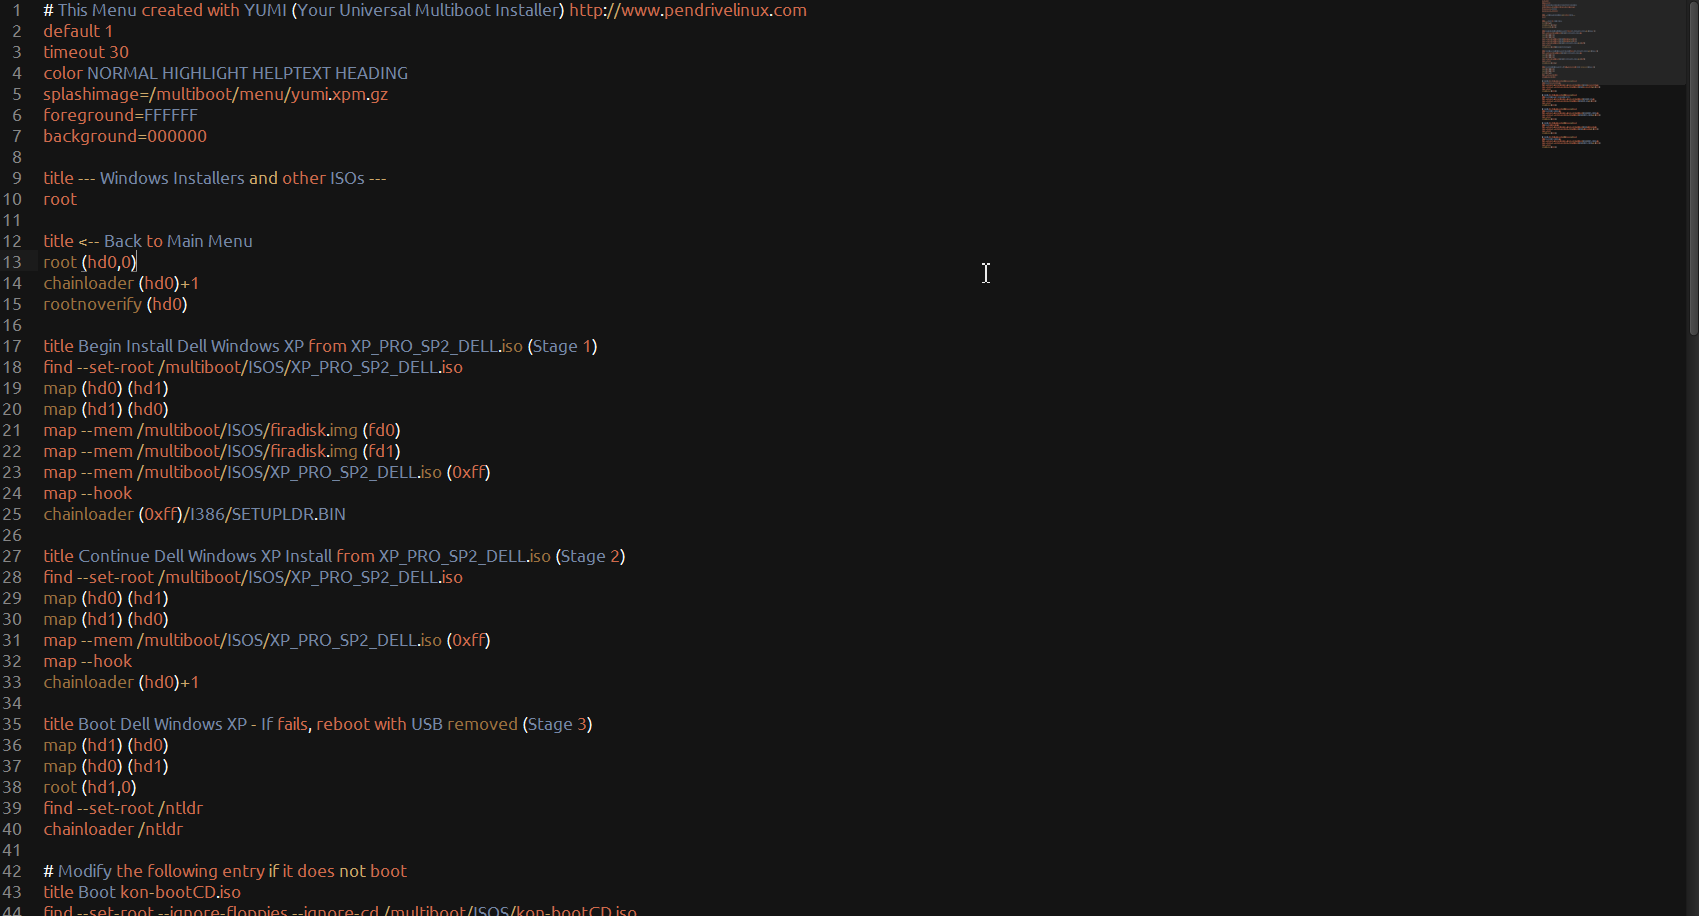
Grub4Dos menu.lst
The second menu for grub4dos, where you can customize all the Windows and Unlisted ISOs will be located at
D:\multiboot\menu\menu.lst
and will look like the image below.
It should be pretty self explanatory, just modify the wording as you would like, save the file and voila!
Adding PortableApps to Flash/USB Drive
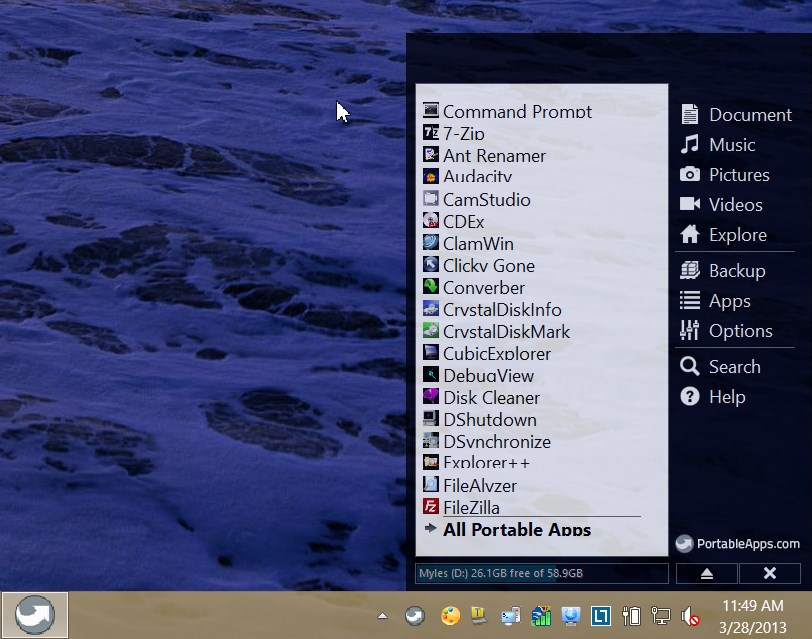
PortableApps Start Menu
Next step is to add PortableApps to the flash drive. This is what I use when i’m not booting directly to the flash drive, and it gives you a “sort-of” start menu style interface for the flash drive. You can then install all kinds of portable apps from their repository, or even add your own. These apps will then be accessible from this “start menu” … this is where I normally add things such as virus scanners, malware scanners, networking tools, common software installers, etc. PortableApps even creates a “Documents” folder like you would have under Windows where you can store pretty much anything. By far the best usb app manager out there.
You can download PortableApps here:
http://portableapps.com/download
When you go to install PortableApps you should install it on the ROOT of your drive. It will create two folders, “Documents” and “PortableApps”. It will also create two files in the root, “Autorun.inf” and “Start.exe”. The autorun.inf file specifies what file to run when the flash drive is plugged in, as well as the title of the flash drive. Start.exe is the file that will run the PortableApps start menu.
Once you have this installed you have created the ultimate USB flash drive. Congrats.
Related Posts


-
steve6375
-
Silas
-
steve6375
-
-
Silas
-
bdone
-
Micaiah
-
James Wilson
-
Ktululz
-
Foli
-
Bogdan Gheorghe
-
Micaiah
-
-
ely ma
-
artlover20112 .
-
514p4h03
-
Dinamon
-
-
Myles McNamara
-
Myles McNamara
-
Jonf
-
Myles
-
-
bdone
-
Myles
-
bdone
-
bdone
-
-
-
-
Hel M.
-
Jon
-
Myles
-
-
Kevin
-
Anonymoose
-
Myles
-
-
Myles
-
fixed h-stats.sh